


Helping You Think Through Your Shot, Especially On A Tough Par 3 Hole
By Ryan Gager
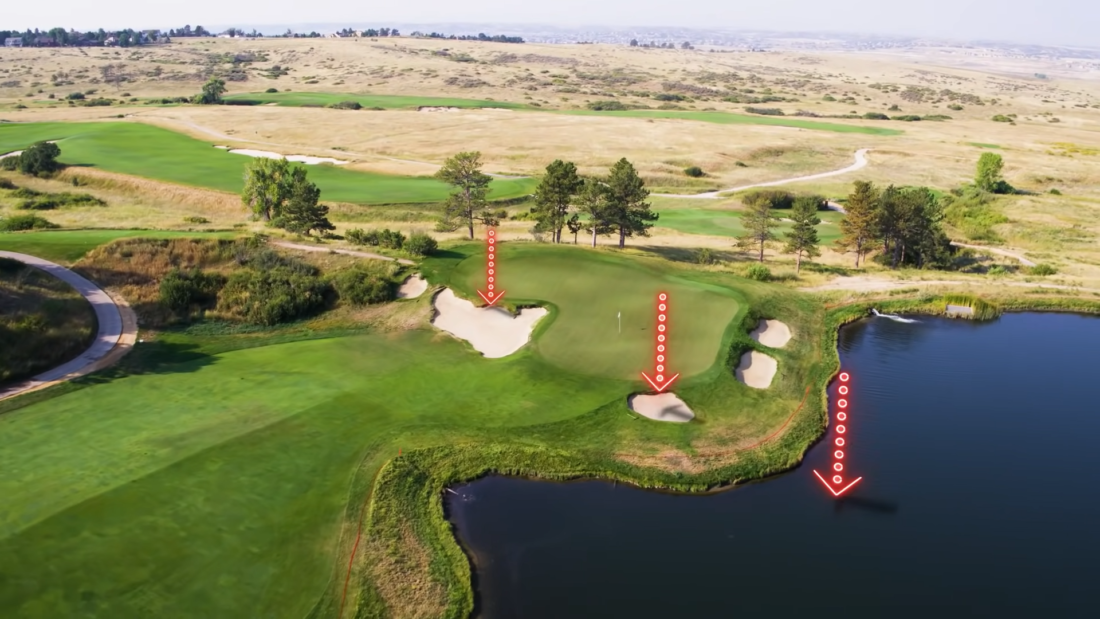
When you come to a par 3 during your round, what is your approach? Do you simply get the distance to the pin, grab and club and aim for the flag? GOLFTEC’s Nick Clearwater has a different tactic as he takes us through picking landing spots that will help you improve your scores. We join Nick on the 11th hole at Colorado Golf Club, a tough par 3 that has several trouble areas. Follow Nick’s advice to be able to navigate these difficult holes. For more help on approach shots into greens, check out these Target Practice Tips.
Finding The Trouble And Aiming Away From It
The first thing Nick does when picking landing spots is looking at where the trouble is on the hole. There’s a bunker on the left, a bunker short right, and water short and right of that.
Notice how there hasn’t been a mention of anything long, so while the pin is 170 yards, your aim point should be past the pin to avoid the trouble.
Nick talks about wanting to hit this shot 180 yards, to get him past the pin where he will be able to utilize the bigger portion of the green. If he hits a good one to his number at 180 yards, he will have about a 30-foot-putt for birdie, and more importantly, avoid a big number.
However, if Nick mishits his shot a little bit and it goes short of 180 yards, he would still be on the green, instead of trying to hit it 170 yards, and it going short into the bunker, or worse, the water.
Understanding Your Skill Level and Dispersion Patterns
As Nick heads up to the green, he starts to tell the story of dispersion patterns for three different levels of golfers – 70s, 80s, and 90s players. Follow this guide when picking landing spots:
- Golfers who shoot in the 70s have an average dispersion of 18 yards for a shot of this distance, which is the width of the front part of this green. So, it’s ok for these golfers to aim at this middle hole location.
- For golfers who shoot in the 80s, the dispersion pattern increases to to 27 yards, which stretches from the bunker on the left to the bunker on the right.
- For golfers who shoot in the 90s, the dispersion pattern widens to 36 yards, double that of a 70s player. This is where it would definitely be beneficial to aim past the pin to the widest part of the green.
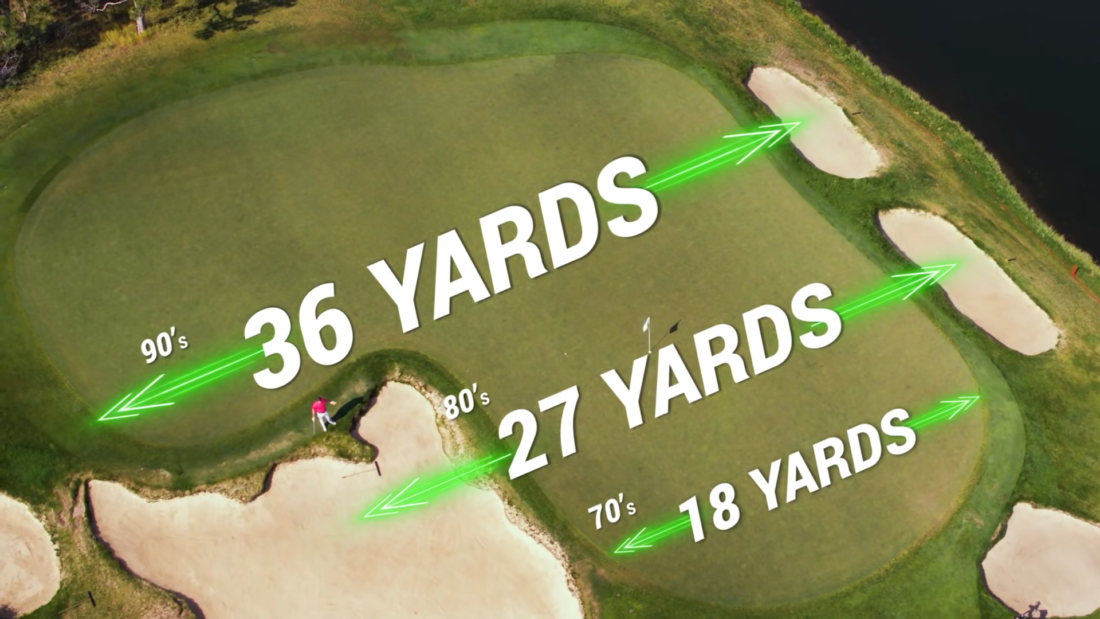
Keep in mind that these patterns are only measuring width. You also will need to factor in the depth of shots, which again points to aiming long so that you avoid the front bunker or water if your shot comes up short.
You can figure out your dispersion pattern on your own, especially if you have a launch monitor at home. Hit 10 shots with each club and calculate the average dispersion, both width and depth. This is also a great way to challenge yourself to improve on those numbers. If you are looking to purchase a launch monitor, visit the GOLFTEC Pro Shop for great deals, including the SkyTrak Tee Off Package. Of course you can always stop in to your local GOLFTEC to work with a Coach who can help you with your dispersion numbers.
Interested in more instructional content from GOLFTEC?
Fill out the form on this page and you’ll be subscribed to future emails with great videos, tips, drills, and more.
A local Coach will also contact you to discuss your game and how lessons or a fitting at a local Training Center may benefit you.

